How To Install Under Cabinet Lighting (2024 Guide)
Did you know that a whopping 92% of homeowners aim for sustainable elements when renovating their kitchen? Well, now that we've stated that rather irrelevant piece of information, let's get on with what you came here for: how to install lighting under your kitchen cabinets!
In this article you can expect the most thorough guide on installing LED under cabinet lighting on the world wide web.No jokes this time! We completed an install for cabinet lighting just the other day, and we're here to share our exact process. If you're looking to add this modernizing touch to your kitchen, read the rest of this guide to achieve the same outcome we did.
P.S. Or you could watch the video? If an image is worth a thousand words, how much is a video?
The different types of under cabinet lighting
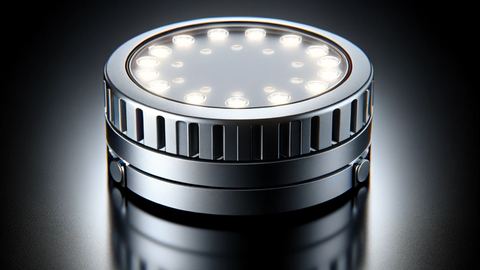
Puck Lights - Worst
LED puck lights are small round fixtures. They generally attach with double sided tape, and are battery powered. The reason they're a poor solution for under cabinet lights is that they do not provide an even light. Unless you want to install an army of them! This is where LED light bars and LED strips have the untold advantage.
There are only two reasons that come to mind, that would make you choose puck lights as lighting under your cabinets. One, they make a decent solution if you specifically want battery powered lights. Two, you're intent on doing this the lazy way. Just don't expect it to look fantastic.
Light Bars - Okay
Next up, light bars. We'll be a little kinder to these guys. They do provide bright and even illumination, but they do have their short falls. The biggest problem: their length isn't customizable! You'll have to order a wide variety of sizes to fit them under each cabinet in your kitchen.
Some other issues include:
Tricky to install.
Large size makes them harder to conceal.
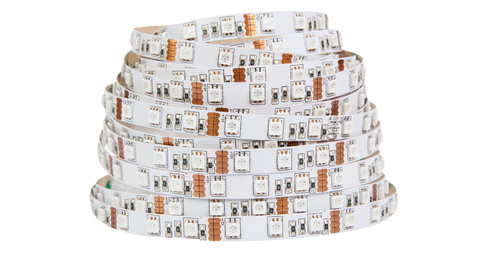
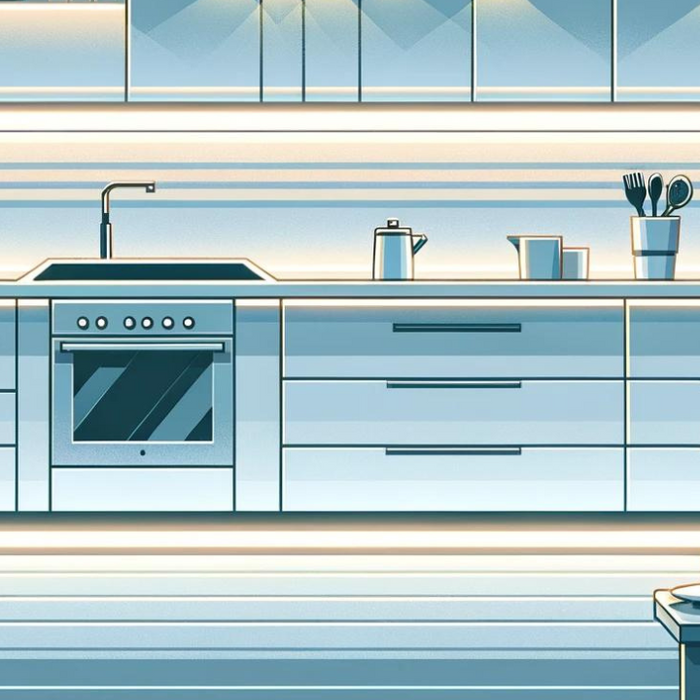
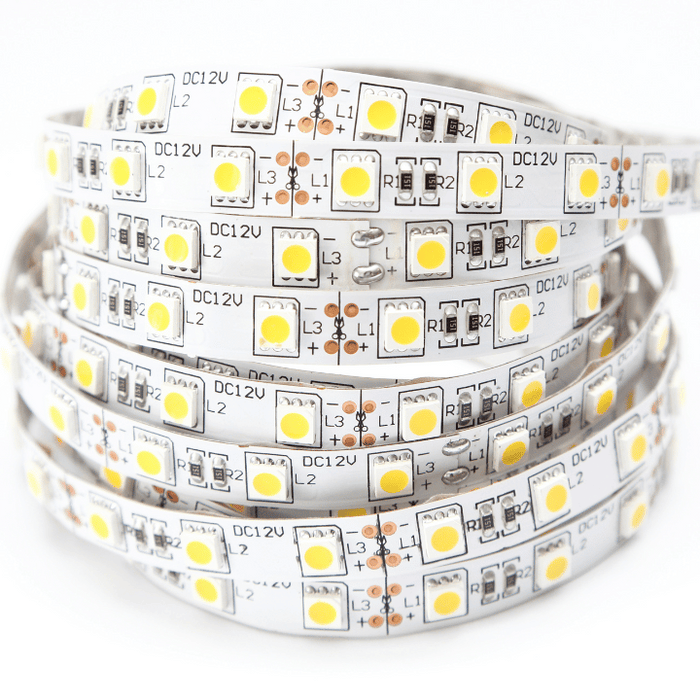
LED Light Strips - Ideal
We aren't biased. Again, no joke. LED tape light sets itself apart for under cabinet lighting in your kitchen for these 4 reasons:
Their length is customizable with one cut from a pair of scissors.
They're easy to install (Especially if you use our video guide!)
They're low profile, giving you that indirect lighting effect.
They provide even illumination along all your cabinets.
It sounds to good to be true? It actually is pretty darn good. The only problem is that most people have no idea how to properly install LED lighting under their cabinets. You can gain the know-how in the next section, and avoid the errors we see so often.
Common mistakes made when installing under cabinet LED lighting
The biggest misconception about LED strips... I can just stick them anywhere and we're good to go. Unfortunately, no. For a professional install that will actually last you'll need to use an LED channel. We offer the
Cabi12 aluminum channel designed specifically for under cabinet lighting. It's what we used for our project.
6 Reasons to use a channel/profile with under cabinet LED strip lighting:
Protection from steam and oil.
Allows you to angle your lighting.
Diffuses light - no reflected spots on your granite counters.
Heat dissipation prolongs your LED strip's lifespan.
Dust protection.
Proper surface for adhesion. The strip won't lose it's stick in a year, and fall off your cabinets.
Seeing as we determined LEDs to be the best choice for installing lighting under your cabinets, you're probably thinking: "Great, this is only gonna cost me $30. I've seen those kits on Amazon." Think again: you'll end up with a junky looking result, and they they'll probably fail inside a year.
We'd love you to buy from us, obviously. We can create custom LED fixtures made up with profile, strip, wiring, power supply, and smart control included! Just like in the video, but tailored to your cabinets.
We won't cry if you don't choose us, but we will if you buy a strip off Amazon! Rather splash out the extra cash and buy commercial quality LEDs. You'll save in the long run on electricity and long lifespan. Plus it'll look a million times better. Okay, maybe just 10 times.
Preparing to install under cabinet lighting
Finally! Hopefully you skipped all that ↑ through our table of contents. If not, well, you made it here anyway. Let's get ready to install your under cabinet LED strip lighting!
The tools you'll need
Installing LEDs under your cabinets is not a complicated endeavor. You should be able to find most of the tools required in your garage, or your neighbors' ;)
Required tools:
Drill
Wire cutters/strippers
Vacuum cleaner
Scissors
Screws (small)
Mini screwdrivers
Common screwdrivers
Soldering iron or strip connectors (We do all the soldering for you!)
Cloth/rag
Optional tools:
Oscillating multitool
A helpful pal with spare time (Rare find)
Planning your project
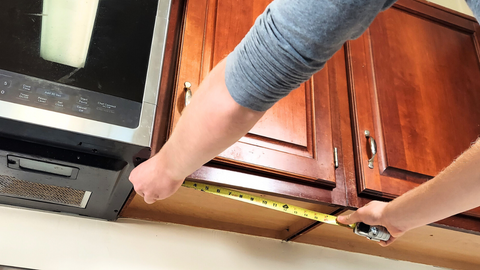
Determine each section of your cabinets that will need LEDs underneath.
Take measurements of each section and send them in to us. Simple as that. Sending us some pictures of your kitchen and your cabinets would help as well.
Otherwise you can use your measurements to order all the products you'll need. You can use the
materials section a little further on as a guide for that.
One last thing you should definitely be giving some thought: What color temperature do you want the lighting under you cabinets to be? A soft warm white for accent lighting, or a brighter white for your everyday kitchen tasks? (You can actually have both, with a tunable white strip.) Or maybe you even want to have a colored light, for festive occasions!
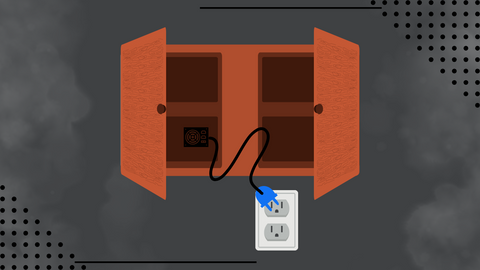
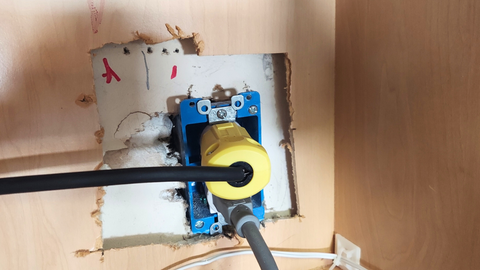
Finding power
It's a good idea to figure out now where you will draw power for the LEDs. Start with this question: Will you use a kitchen plug point (easiest), or hardwire into your home's electrical system?
Unless you don't have any plug points to spare, we recommend using that method. Hardwiring will require an electrician, which is inconvenient. Especially the bill.
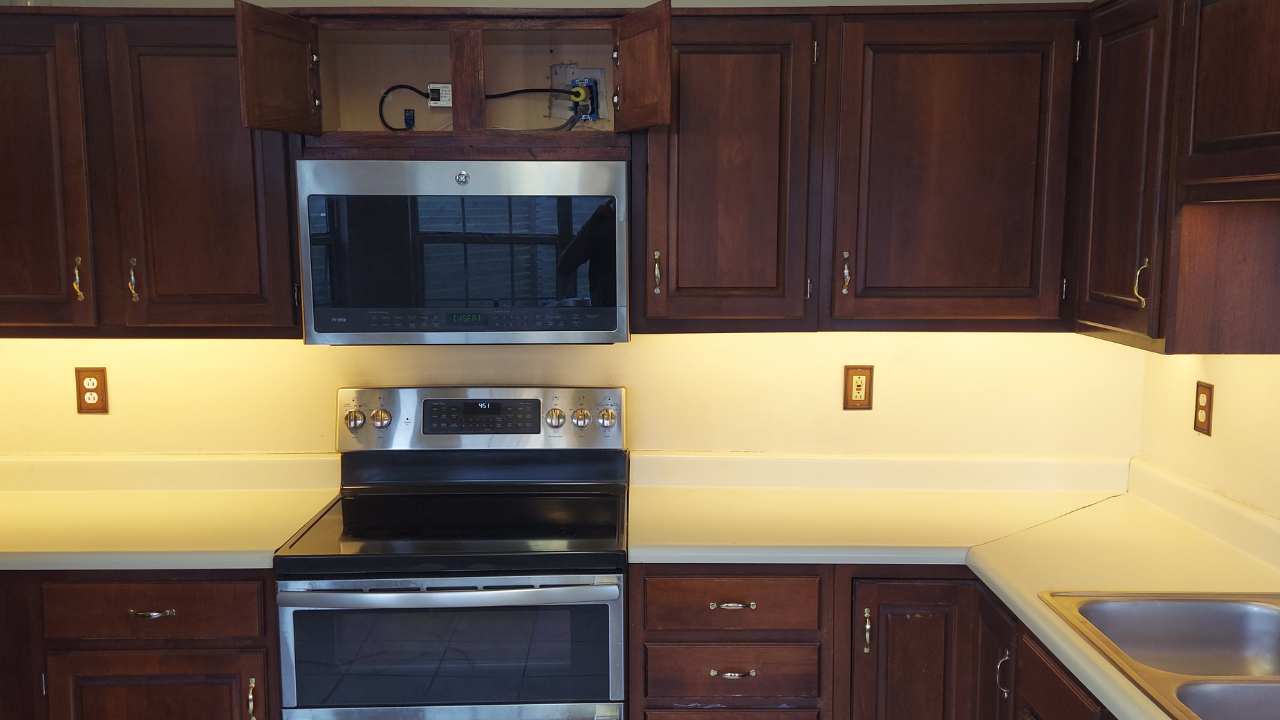
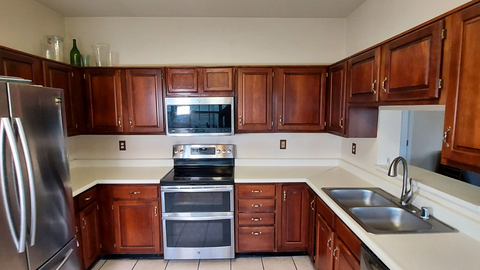
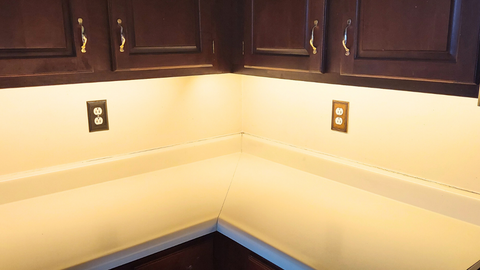
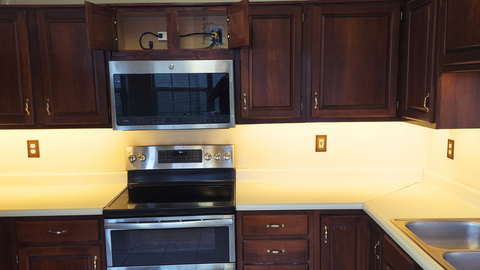
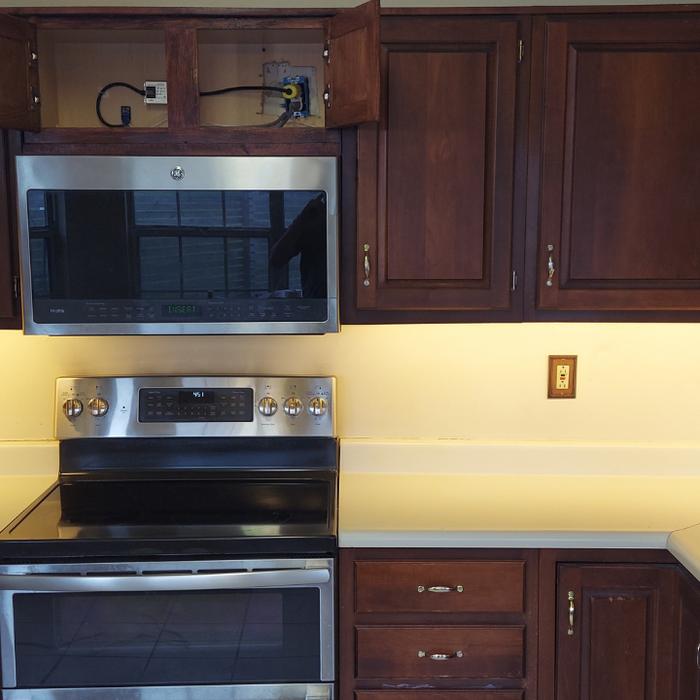
Some kitchens have outlets inside the cabinets, which is what we found. This is the best, as it's really inconspicuous. Just note that if the microwave is using it, some areas' electrical code requires a microwave to be on its own circuit.
Here are 3 pro tips for placing your power supply:
Avoid dusty areas, like above your cabinets. Dust can cause your PSU to die an early death.
The area should have some ventilation to prevent overheating. Avoid tight spaces — e.g., inside a wall.
Test your plug point before deciding on it! You can use a phone charger to check easily.
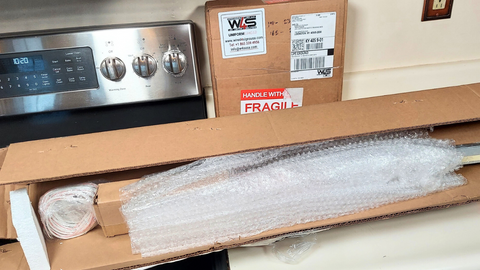
Purchasing the materials
This is a list of everything we needed to complete our own project. Use it to buy your own supplies, or as stated above, send in your measurements and we'll assemble a list of everything you'll need.
Cable managements pads (optional - available at hardware stores)
Industrial double sided tape
Denatured alcohol
Solder or strip connectors
Remember, high quality products = energy efficiency, longer lifespan, and a professional look.
Once you have your materials, it's time to get started with the installation!
Installing under cabinet lighting
Planning a wiring path
You need to plan where you will run your wiring. Bear in mind, you will need wires running from fixture to fixture, and then also to the power supply at some point.
Your PSU and controller may be at one end of the series of fixtures or, as in our case, right in the middle. Having it in the middle is advantageous because it lowers the voltage drop. The power will have to run through roughly half as much strip and wire.
Dimmer lighting on the end furthest away from the PSU is common, and the aesthetic is bad. This is due to voltage drop. Aim to place it in the middle, or buy a more powerful PSU for smooth even light.
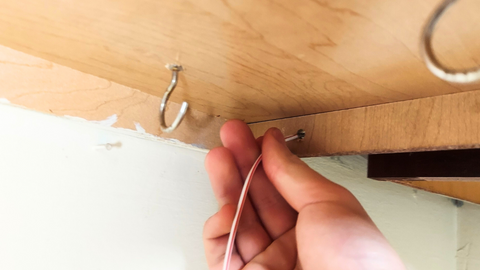
Drilling wiring holes
When the above is all sorted, get your drill out. And choose a bit just thicker than your wires.
Drill through the cabinet joints to run wiring from fixture to fixture. Sometimes you need to jump up a level. For instance, you may need to go over your microwave or sink. To do this, just drill up into the cabinet to run the wires there.
Drill before you install your fixtures to avoid damaging them.
Clean up all the sawdust with your vac.
Installing the LED fixtures under your cabinets
If you decided to order from elsewhere, you'll need to take some extra steps here:
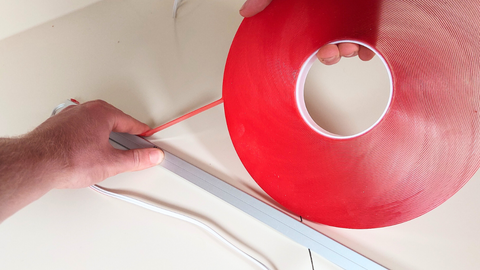
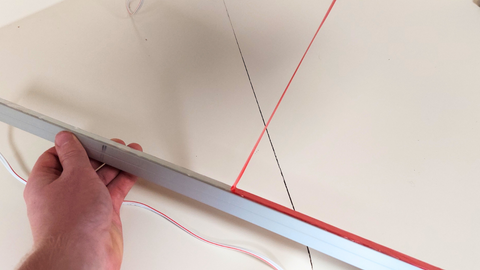
Cut your profile into the desired lengths, leaving an inch of space on either side compared to the space underneath the cabinets. We have video on how to cut profiles:
How to cut LED profiles the right way. (Pro tip: cut your diffuser simultaneously.)
Solder wires onto the ends of your strip. Make sure they are long enough. You can use connectors for this step.
Stick your strips into their profiles.
Click the diffusers onto their profiles.
Attach end caps if you have.
When you buy from us we can do all the above for you. If you did, move straight on to this list:
Lay your fixtures out on the counters and ensure they each fit into their respective positions.
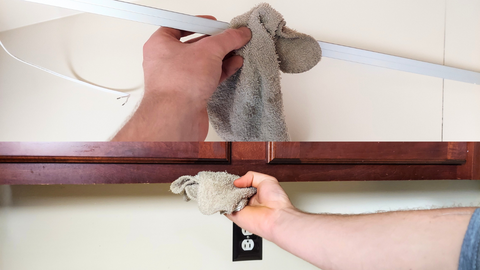
Wipe down the profile and the underside of the cabinet. Use denatured alcohol and a rag.
If you're using the Cabi12, ensure you have the right orientation. Skip to 3:06 in the video.
If you're using a profile that angles the light, position it against the front lip of the cabinet. This way the light will shine onto the wall for smooth even light. It also reduces glare on the countertops.
If the profile you're using shines straight down, you could place it closer to the middle of the underside of the cabinet.
Attach double sided tape to the profile.
Remove the backing paper off the tape and stick your profile into position.
Repeat the process for each fixture.
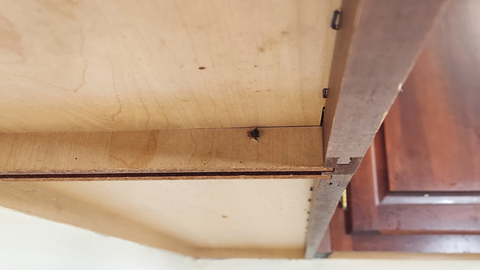
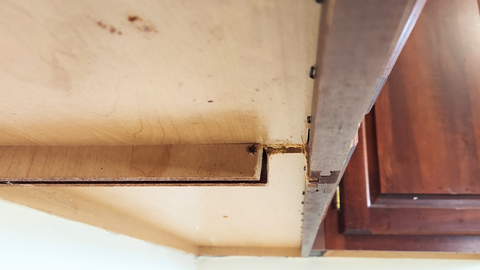
Cutting cabinet joints
Sometimes you want to cut the joints between cabinets to lessen the amount of individual fixtures required. You can do this quickly using an oscillating multitool. Be sure to cut a small notch. We had to do this once during our project, and it was super easy.
Running your wires
After attaching the LED light fixtures to the underneath of the cabinets, their lead wires should be hanging down into space. Pull them through the holes you drilled earlier. Pull them fairly tight; you don't want a loose wire hanging from the underside of a cabinet.
Connecting the fixtures
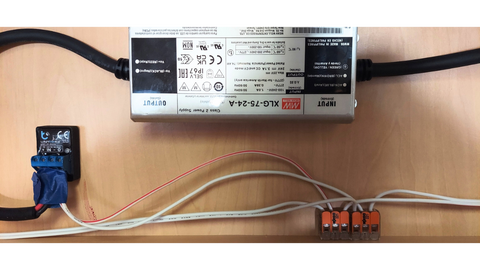
Stick 2 inline Wagos side by side onto a piece of double sided tape. You'll need more than 2 if you're using tunable white or colored strips. You'll also need to do this for every connection you'll be making between fixtures.
Select a spot inside or underneath a cabinet to make the connection. Cut wires from one fixture to length, strip them, and insert them into the Wagos. Now cut and strip the wires from the other fixture and insert them. Make sure the negative wires from either strip are in the same Wago, and the positives are in the other.
Remove the backing paper from the double sided tape and stick the Wagos to the cabinet.
Skip to 4:56 in the video for the full process.
Pro Tip: Don't leave plenty of slack when cutting your wires, otherwise you'll have excess cable to deal with. Also be sure to not cut too short, otherwise you'll end up adding a 1 inch extension. Be meticulous and get it right the first time.
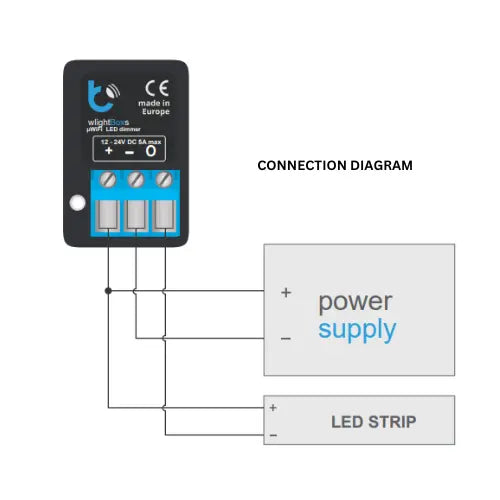
Installing the controller
Time to wire your strips into the smart controller.
Choose a spot for your controller. We mounted it with tape to the back of the cabinet. Don't mount it yet. That comes later.
Ensure your wires will reach the spot you chose.
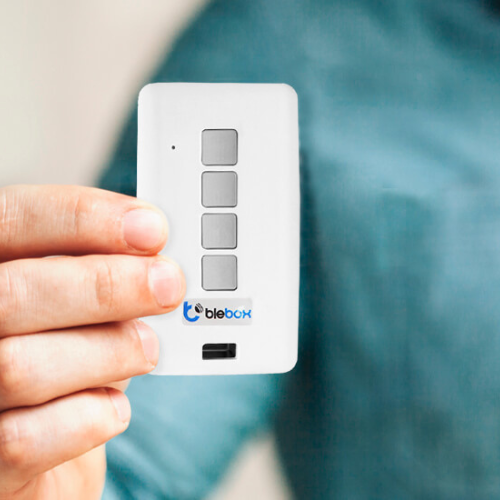
Connect your wires to the controller. You should be able to get wiring guide from where you bought it. We used this small Blebox controller. Diagram below.
When this is all done, leave the controller. We'll get back to it later.
Pro tips:
Because this is being installed between 2 fixtures we used Wagos to reduce the wiring down to one wire for positive and one wire for negative.
We used cable management pads here to keep things neat inside the cabinet!
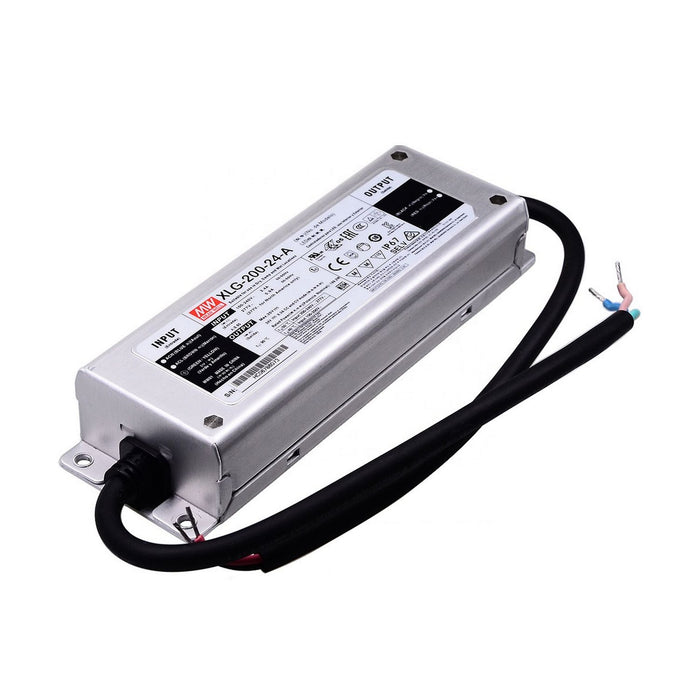
Installing the power supply
A power supply/transformer/driver/PSU simply takes the 125 volts from the outlet and converts it to 12 or 24 volts. Some power supplies plug straight into the outlet, while higher quality ones like the PSU we used have live, neutral, and earth wires that need an adaptor.
We used our Compact IP67 Waterproof LED Driver (24V) ~ Meanwell XLG Series for the under cabinet lighting. On the input side you have a brown live wire, a blue neutral wire, and a yellow/green earth wire. On the output there is a red positive wire and a black negative wire.
You can get an adaptor from a local hardware store such as Lowe's, Home Depot, or Menard's. Just read the manual to make sure you are connecting the wires to the correct terminals! Skip to 11:10 in our video to learn more.
Turn off the circuit your outlet is on and plug in the power supply. Select a mounting position with it plugged in to ensure all your cables reach.
Our PSU mounts with small screws, but if yours is smaller you could even use the double sided tape.
Wire the power supply into the correct terminals on your controller. Now you can stick the controller onto the back of the cabinet.
Pro tip:
Turn off the electricity for the circuit you're working on. Please!
Connecting your phone to your lights
Your install is complete, now we just have to control it. Your controller will have its own dedicated app, but if you used one of our Blebox controllers do the following:
Install the Blebox app.
Add the device to your home in Blebox. Watch our video to learn how.
Take control.
If you would like to include a physical switch in your setup, consider the
Blebox uRemote. No wiring required; it works over Wi-Fi. Get the pro version for an awesome metal finish.
The end result
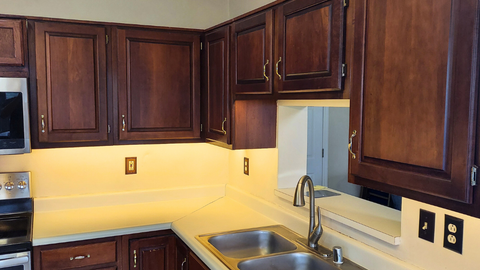
Just what we had hoped for: smooth, even, and functional lighting under the cabinets! The best thing about under cabinet lights is that they're useful, and make your kitchen look classy at the same time.
If you choose to use our products under your own cabinets, we hope that you're as happy as this homeowner was!
Troubleshooting under cabinet lighting
Here's a quick list of steps you can take to troubleshoot your lighting when it's not working like it should.
Are all your wires pushed right into their Wago connectors?
Are the wires properly stripped? If not, you could have a dead connection.
Is the power supply's plug point working? Test it with a phone charger!
Are the connections to your controller correct?
Have you mixed up positive and negative at one of the Wago connections?
Are the connections from the PSU to the plug point adaptor correct?
If none of those steps solve your problem, please give us call or leave a message. We'd love to help out, and we do respond.
How much to install LED strip lights under cabinets?
The total cost for this project came in at around $475. Some might consider that to be a excessive amount, but take these points into consideration:
It adds the same value as it costs to your home if you were to sell.
Commercial LED strips like ours are more energy efficient.
Our products last for longer, which means you won't have to reinstall every 2 years.
Using a $2000 spectrometer, we've found our strips to be 13-25X brighter than strips on Amazon.
When you buy from us we can create the fixtures for you, saving your time.
Note that the cost for your project will vary depending on the amount of cabinets that need LED lighting underneath.
How long does it take to install LED lights under cabinets?
This job took us all day, but we videoed and photographed the whole process. If you were to use our prebuilt fixtures it should only take you about 2-3 hours. The double sided tape makes installation a breeze!
If you had to build the fixtures yourself, which includes cutting the profiles, you could expect an additional 2 hours.
Using a plugin over hardwired system also speeds things up considerably.
Reviews for under kitchen cabinet lighting
Hear what customers who used our products for their cabinet lighting projects have said about the process.
Frequently asked questions
Q: What is the best type of lighting for under cabinets? A: LED strip lighting is the best type of under cabinet lighting. It's energy efficient, and has a long lifespan. Plus the customizable nature of LED strip makes it ideal for easy installation under any cabinet.
Q: Is under cabinet lighting still popular? A: Yes, LED lighting under kitchen cabinets is still extremely popular. Many homeowners have it, and more are installing it every day! It is one of the most popular uses for LED strips.
Q: How do you hide wires for under cabinet lights? A: You can hide the wires underneath or inside the cabinets. Use cable management pads to keep everything neat and to ensure no wires hang down into sight. In our project not a single wire was visible without bending down or opening a cabinet.
Q: Should under cabinet lights be warm or cool? A: It is generally best to match the color temperature of under cabinet lighting to the color of the existing lighting in your kitchen. Consider using a tunable white strip so that you can change between warm and cool white whenever you like!
Q: Where do you put LED lights under cabinets? A: When using an angled profile like the Cabi12 mount them against the front lip of your cabinets. If you have your lights shining straight down aim for about 3 inches from the front lip of the cabinet.
Q: Do LED under cabinet lights get hot? A: LED strips are up to 18X more energy efficient. They convert 95% of their consumed electricity into light, emitting only 5% as heat energy. This means heat output is minimal, especially with the inclusion of a profile.
Q: How many lumens do I need for under-cabinet lighting? A: Aim for an LED strip rated over 1000 lumens a meter. Anything less will not be as useful for task lighting. If you're simply wanting accent lighting you might consider a dimmer LED strip.
The most thorough guide to installing LED lighting under your cabinets on the world wide web. Every step from purchasing materials, to controlling your lights is covered in detail. A video is also available.
Learn the fundamental differences between hardwired and plug in under cabinet lighting. Decide which option is best for you with our detailed pros and cons. And learn how to install plug in lighting yourself!
Are you looking for creative ways to enhance the lighting in your bathroom? Look no further than the Bathroom Lighting Inspiration Gallery! Here, you'll find a wealth of ideas for incorporating LED lights and strips into your bathroom design, creating...
Should I install under cabinet lighting? I want it, and it looks so good. Do I really need it, and is it as great as people say it is? If these are the questions running through your mind, read our article.
Get guidance on buying the perfect LED strip light for your under cabinet lighting project. A full guide giving you an overview of the features and performance of the strips compared!
Learn why commercial LED strip lights outshine the rest! Discover the secret to longer-lasting, brighter, and more energy-efficient lighting solutions.