An LED controller is a device that allows you to manage the brightness, color, and patterns of LED strip lights. It connects to the LED strips and serves as the brain of your lighting setup. LED controllers come in various forms, such as a remote control, wireless controller, or even app-based systems like those compatible with Amazon Alexa.
With an LED controller, you can create dynamic lighting effects, customize color schemes, and even synchronize lights with music for an immersive experience. These controllers are essential for achieving a cohesive lighting experience, especially in larger lighting systems or smart lighting systems.
Table Of Contents
- RGBW Strips
- RGB Strips
- Pixel/addressable Strips
- White and Single Color Strips
- Tunable White Strips
- RGBWW Strips
Connection Guides By Strip Type

Connecting your LED lights to an LED controller involves understanding the wiring setup for the specific type of strip lights you are using.
Each type of LED strip has unique wiring requirements, and following the correct process ensures safe and efficient operation. Below are detailed guides for connecting various LED strip types.
Connecting an RGBW Strip
[product=casambi-4-channel-bluetooth-pwm-controller]
[/product]
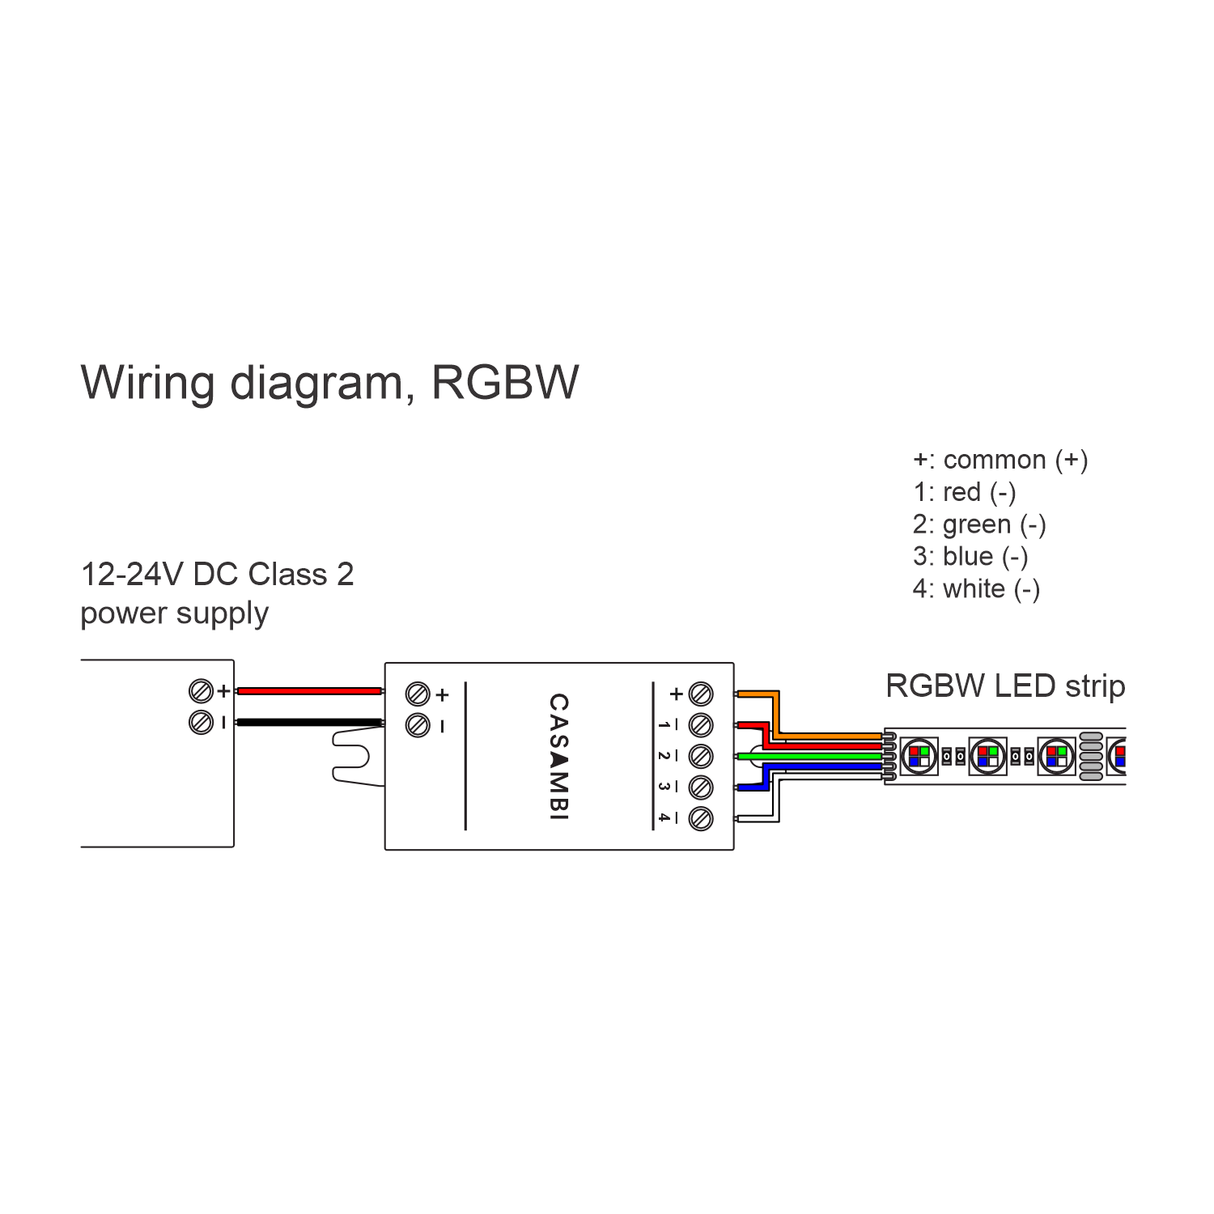
For RGBW (Red, Green, Blue, White) strips, start by identifying the wires. Typically, these strips have a red wire for red LEDs, green for green LEDs, blue for blue LEDs, white for white LEDs, and a black or common wire for the ground. Follow these steps:
- Turn Off the Power: Ensure the power supply is disconnected.
- Connect Wires to Controller Terminals: Match the red, green, blue, and white wires to their respective slots on the controller. Attach the black wire to the ground terminal.
- Verify the Power Supply: Ensure your power source matches the voltage and amperage requirements of the strip and controller. For example, many RGBW strips use 12V or 24V DC power supplies.
- Secure Connections: Use electrical tape or heat-shrink tubing to stabilize and insulate the connections.
- Test the Setup: Reconnect power and use the controller to adjust colors and brightness, ensuring all LEDs function correctly.
For RGBW strips, connect the red, green, blue, and white wires to their respective controller terminal slots. The black wire serves as the common ground. Use a compatible LED controller, such as the Casambi 4-Channel Bluetooth PWM Controller. Ensure that your power source provides the correct voltage and amperage.
Connecting an RGB Strip
In most cases, RGB strips can run off RGBW controllers. Here's an example of an RGB strip connected to the PWM4 controller seen above.
RGB (Red, Green, Blue) strips are similar to RGBW but lack the white wire. Follow these steps:
- Identify Wires: Locate the red, green, blue, and black (ground) wires.
- Connect to Controller: Insert the red, green, and blue wires into their respective terminals on the controller. Connect the black wire to the ground terminal.
- Secure the Setup: Stabilize the connections using clips, soldering, or electrical tape.
- Test Functionality: Turn on the controller and test different colors to confirm a proper connection.

Connecting a Pixel/Addressable LED Strip
[product=wireless-led-controller-pixelbox]
[/product]
RGB Pixel LED strips are similar to RGB strips, but with addressable strips, each and every LED diode on the strip can be controlled individually. This requires some additional programming in the controller. Follow these steps if you need to wire one:
- Identify Wires: Locate the positive and negative wires coming off the strip. You can see the positive and negative symbols beside each wire where they join the strip. Then locate the data wire.
- Connect to Controller: Insert the positive wire into the + LED terminal. Insert the negative into the negative terminal. Then connect the data wire to the data terminal, marked with a D.
- Connecting the PSU: Take the positive wire from your power supply and insert it into the positive terminal on the controller. Then take the negative and put it into the negative connection. Positive and negative from the PSU may fit into the same junctions and the positive and the negative from your strip. It just depends on your specific controller.
- Secure the Setup: Stabilize the connections using clips, soldering, or electrical tape.
- Test Functionality: Turn on the controller and test different colors and animations to confirm a proper connection.
Pixel LED strips wiring setups can vary, so be sure to check any documentation that comes with yours.
Connecting White Strip & Single Color Strips
[product=wlightboxs-v2-single-channel-led-controller]
[/product]
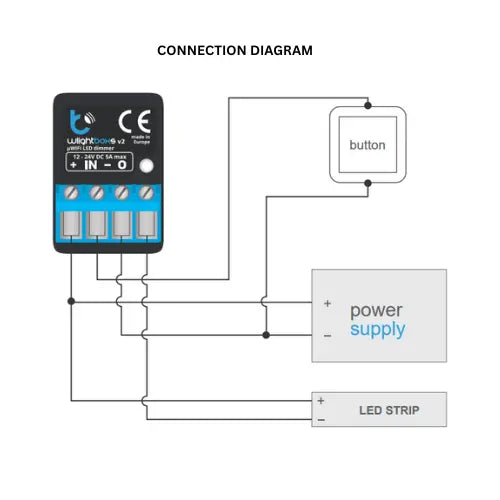
For single-color or white LED strips:
- Identify Positive and Negative Wires: Locate the two wires (positive and negative) from the strip.
- Connect to Controller: Attach the positive wire to the positive terminal and the negative wire to the negative terminal of a single-channel controller.
- Verify Power Supply: Ensure your power supply matches the strip’s voltage requirements.
- Secure Connections: Use connectors or electrical tape for a stable setup.
- Test the Light: Power on and adjust brightness using the controller.
Connecting a Tunable White Strip
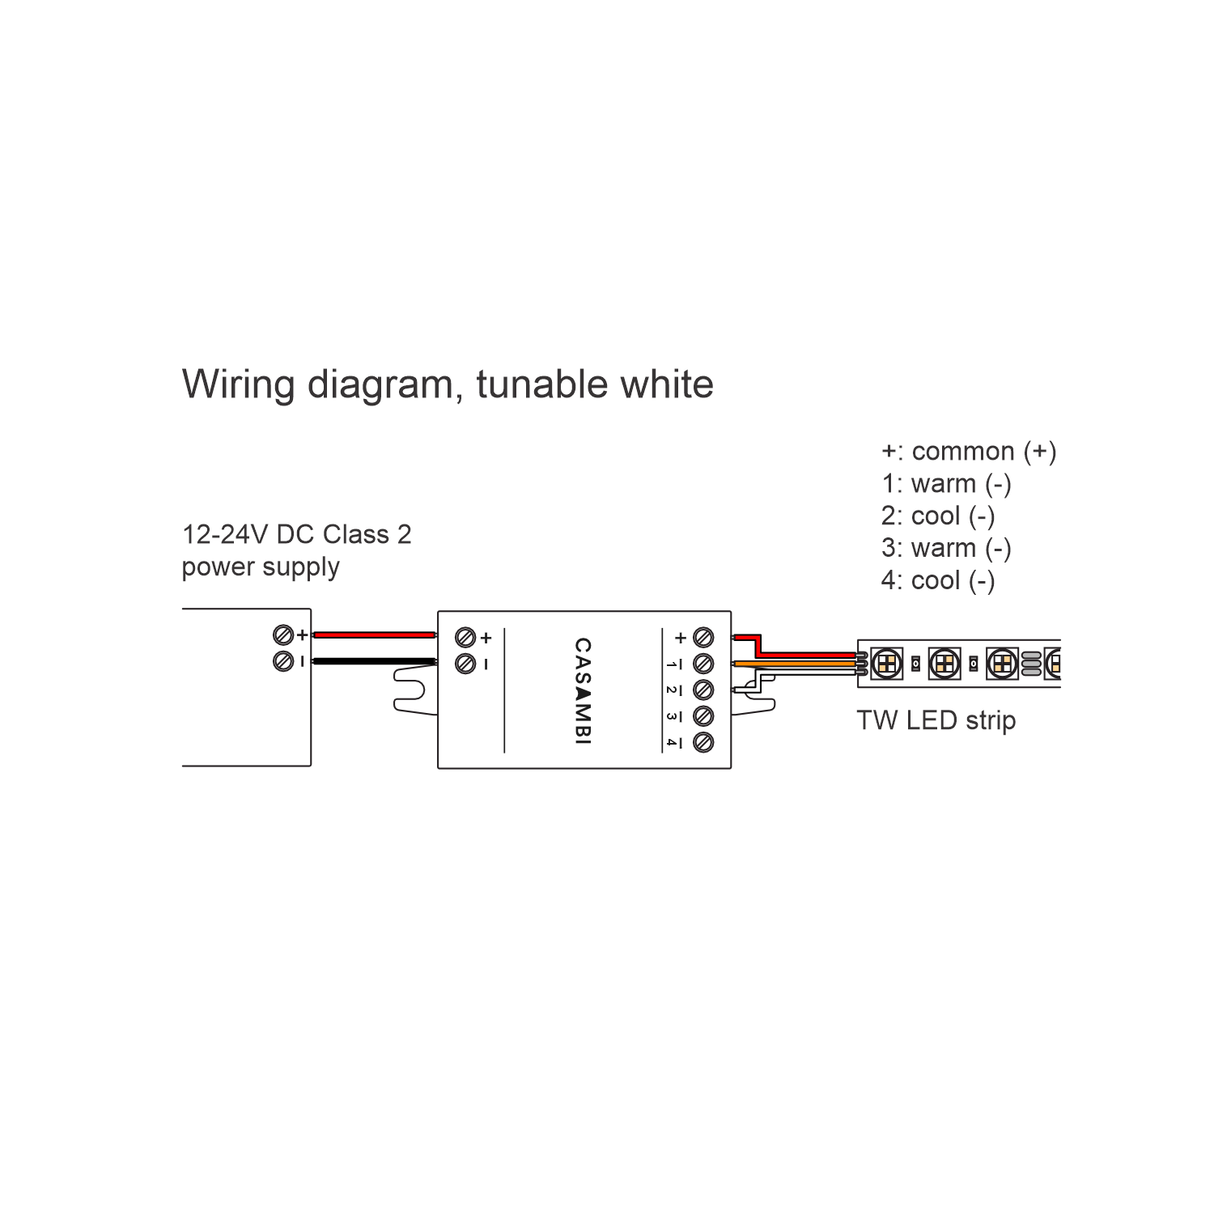
Tunable white strips allow color temperature adjustments between warm and cool white. Most TW controllers have a simple positive junction, and then two negative terminals. One for the cold white wire, and the other for the warm white wire.
The PWM4 is a very versatile controller, and can also be configured to control tunable white strips. Steps include:
- Connect Dual Wires: These strips typically have two positive wires (one for warm white and one for cool white) and one common ground wire. Attach each wire to the corresponding terminal on the controller.
- Match Power Requirements: Ensure the power supply supports both channels.
- Secure Connections: Use heat-shrink tubing or a connector block to keep wires stable.
- Test the Setup: Power on the system and use the controller to adjust the color temperature.
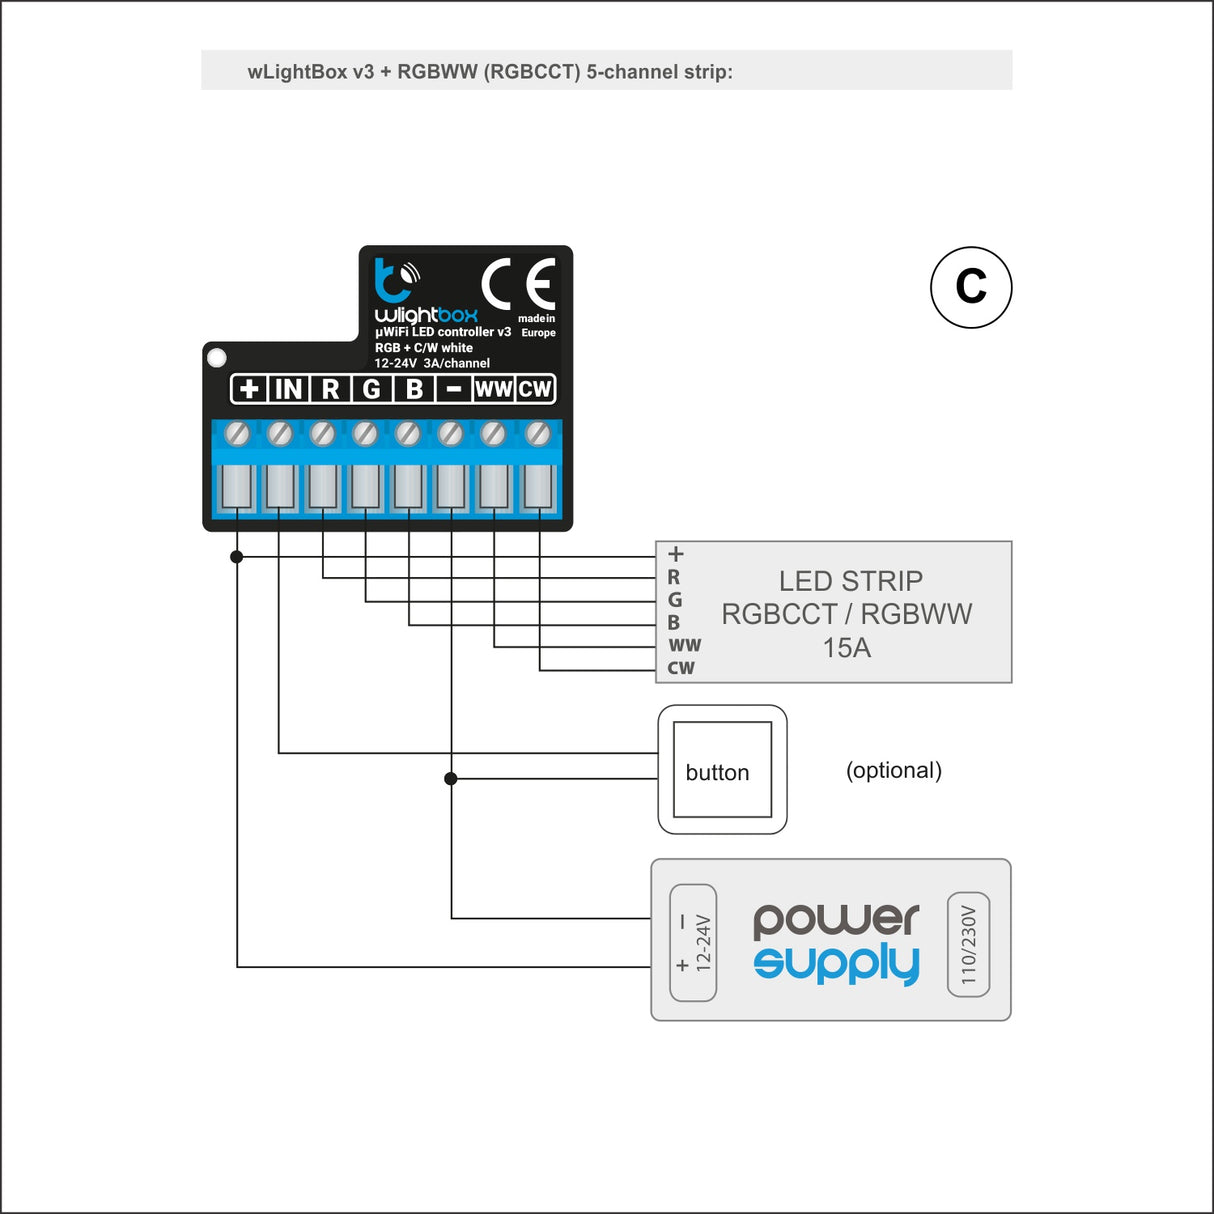
Connecting RGBWW/RGBCCT Strips
[product=wlightbox-smallest-wireless-wi-fi-rgbw-led-controller]
[/product]
For advanced RGBWW (Red, Green, Blue, Warm White, Cool White) or RGBCCT (Red, Green, Blue, Correlated Color Temperature) strips:
- Match Wires to Terminals: These strips have five or six wires. Connect each color wire (red, green, blue, warm white, cool white) to its designated terminal on the controller. The ground wire goes to the ground terminal.
- Use the Correct Controller: Choose a controller that supports all channels, such as a Wi-Fi RGBW controller.
- Ensure Adequate Power Supply: The power source must support the combined load of all LEDs.
- Secure and Insulate: Protect connections with electrical tape or a terminal block.
- Test Full Functionality: Power on the controller and check all color channels, brightness levels, and temperature settings.
Best Practices When Connecting Controllers
Proper installation of your LED controller and strips ensures optimal performance and longevity. Follow these best practices to achieve a seamless lighting setup:
- Turn Off the Power Source: Always disconnect the power source before beginning any wiring. This precaution minimizes the risk of electrical shocks or short circuits.
- Secure Connections: Use electrical tape or heat shrink tubing to protect connections. This step prevents broken cables and ensures a stable cable connection secure enough to handle long-term use.
- Strip Wires Properly: Ensure the wires are stripped to the correct length for a snug fit into the controller terminals. Avoid using excessive force, especially with small screws on the controller.
- Avoid Electromagnetic Interference: Use shielded cables to reduce interference, particularly in larger lighting systems. This ensures a cohesive lighting experience and uninterrupted control signal.
- Match Voltage and Amperage: Use a controlled power supply with the correct voltage and amperage ratings to avoid excessive voltage drop or damage to your LED strips.
Benefits of Using an LED Controller
Using an LED controller enhances your lighting setup with a range of benefits:
- Adjustable Brightness Level: LED controllers provide precise brightness control, enabling you to dim or brighten your strip lights according to your preferences or ambiance needs.
- Customizable Color Options: With features like a color wheel, you can create vibrant lighting displays that suit any mood or theme. RGB controllers, for instance, allow for nearly infinite color combinations.
- Smartphone Control: Many modern controllers are compatible with apps like Amazon Alexa or Happy Lighting, offering seamless control via your smartphone. This feature is especially valuable for smart lighting systems.
- Dynamic Lighting Effects: Create animations, pre-configured scenes, and even time-bound lighting modes to enhance your space’s aesthetics.
- Enhanced Energy Efficiency: LED controllers optimize power consumption, ensuring your setup remains cost-effective while delivering high-quality lighting.
Things To Consider While Installing LED Controllers

When installing LED controllers, consider these key factors to ensure a smooth and effective setup:
- Ventilation: Overheating can damage your controller and strip lights. Ensure proper airflow around the controller, especially for addressable lighting interfaces.
- Maximum Load and Voltage: Exceeding the maximum load or using the wrong voltage can lead to malfunction. Always check the controller’s specifications and use a DC12-24V power supply when required.
- Avoid Wiring With Power On: Wiring live electrical components is dangerous. Always disconnect the power source during installation.
- Cable Quality: Use shielded cables or colored cables for clarity and secure connections. Poor-quality wires can result in excessive voltage drop or signal loss.
Key Takeaways
Wiring LED lights to an LED controller requires careful planning and execution. Understanding the types of LED controllers, using the correct power supplies, and following best practices ensure a seamless installation.
LED controllers offer enhanced functionality, from adjustable brightness to customizable lighting effects. By considering key installation factors like ventilation and voltage requirements, you can create an efficient and safe lighting system.
Frequently Asked Questions
How do I reset my LED controller to factory defaults? Resetting your LED controller depends on the model. Typically, you’ll find a reset button or a specific sequence to follow. Refer to your controller’s manual for detailed instructions.
What is the difference between RGB and RGBW LED strips? RGB LED strips feature red, green, and blue colors, while RGBW strips include an additional white LED for greater color versatility and brightness.
Can I connect multiple LED strips to one controller? Yes, you can connect multiple LED strips to a single controller if the total load does not exceed the controller’s maximum capacity. Use additional power supplies if necessary.


