Adding recessed LED lights to your stairs is a great way to improve safety. Dimly lit stairs can be dangerous. They increase the risk of falls, especially at night.
Installing bright, well-placed LED lights makes your stairs safer. It also gives your space a polished, high-end feel. The added style can even increase the value of your home.
However, the process isn’t as simple as it seems. Wiring can get tricky. Figuring out where to place the lights takes time. Choosing the right type of LEDs can feel overwhelming.
Many homeowners get stuck before they even start. It’s easy to feel unsure about where to begin.
But don’t worry. This guide breaks the process down step by step.
You’ll learn how to plan, cut, and install recessed LED lights properly. By the end of this article, you’ll be ready to upgrade your home with beautiful, long-lasting LED lighting.
Table of Contents
Planning the Installation

Before you start cutting into your stairs, a solid plan is essential. This step ensures that your lights not only look good but also work effectively. A little preparation goes a long way in achieving a clean and professional finish.
Choosing the Placement
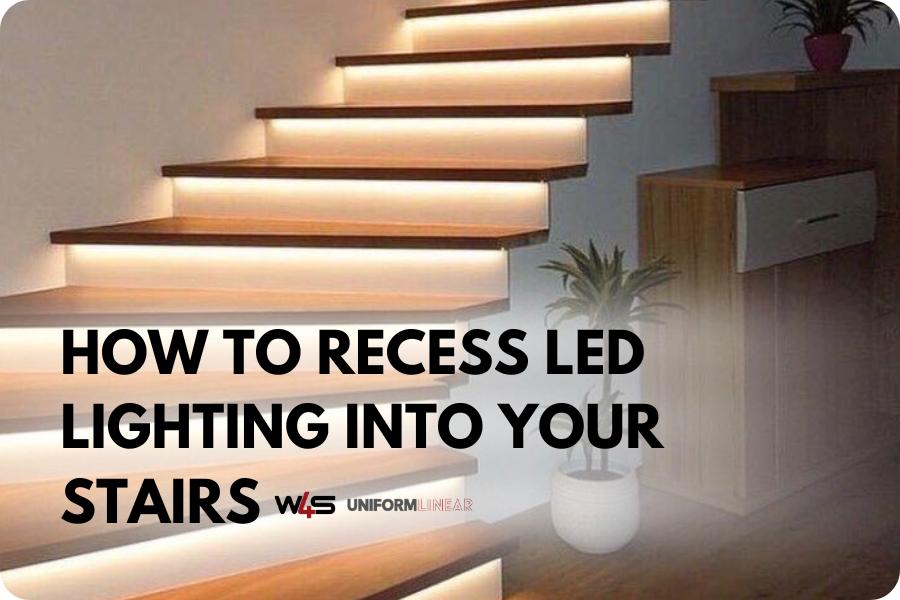
Decide where you want the lights to go. Most homeowners prefer placing LEDs on the risers. This creates a soft glow that highlights each step.
You can also position the lights on the treads or along the side panels. These options provide a more subtle effect.
Whichever option you choose, keep the spacing consistent. Even spacing creates a clean, uniform look that enhances the overall appearance.
Measuring and Marking
Use a measuring tape to mark the exact positions for the lights. Consistent spacing is key to maintaining a polished and cohesive look.
If you’re using recessed LED channels, check the depth of the recess. The channels should sit flush with the surface for a seamless finish.
Selecting the Right LED Type
For recessed stair lighting, LED stair channels or recessed LED channels are the best choices. These channels provide a modern, low-profile look that blends perfectly with the stairs.
Avoid using puck lights or step lights. They don’t sit flush with the surface and can disrupt the clean look you’re aiming for.
Determining the Power Source
Hardwired power sources are the most reliable option for recessed stair lighting. While battery packs and plug-in solutions may seem convenient, they aren’t practical for permanent installations.
Hardwired systems ensure a steady power supply. They also eliminate the need for frequent battery replacements, making them a more durable solution.
Gathering Materials and Tools

To get started, gather everything you’ll need. Having the right tools and materials on hand makes the installation process smoother and more efficient.
Essential Tools
You’ll need a few key tools to ensure a precise and clean installation.
- Drill for securing the lights.
- Router to create recesses for the LED channels.
- Measuring tape to ensure accurate spacing.
-
Wire strippers to handle the wiring properly.
- Adhesive or screws, depending on your mounting method.
Materials You’ll Need
Choosing the right materials is just as important as using the right tools.
- LED stair channels or recessed LED lights for a clean, seamless look.
- Wiring and connectors to link the lights to the power source.
- Power adapter or hardwired connections for consistent power.
- Waterproof LEDs to prevent moisture damage during outdoor installations.
Extras for a Clean Finish
To achieve a polished result, consider adding a few extras. For instance, waterproof LED channels protect against moisture in outdoor installations, and a motion sensor or dimmer switch offers added convenience and control.
Cutting and Preparing the Stairs
Once you have your plan and materials ready, it’s time to prepare the stairs. This step is where the magic happens, but it requires precision.
Taking your time during this phase will ensure a seamless and durable installation.
Creating Recesses for the LEDs
Use a router to cut clean, even recesses into the risers or treads where the LED channels will be placed. The depth should be just enough to allow the lights to sit flush with the surface.
Take your time to avoid cutting too deep or unevenly. Double-check the alignment to keep the lights straight and consistent.
Ensuring Proper Depth and Fit
Double-check that the recesses are deep enough for the lights to sit securely but not so deep that they become loose or unstable. A flush fit ensures a polished and professional finish.
If the lights sit unevenly, make small adjustments to the recess depth before securing them.
Installing the LED Lights

Now that the stairs are ready, it’s time to install the lights. Taking extra care during this step ensures a clean and professional finish.
Securing the Lights
Use adhesive or screws to secure the LED channels into the recesses. Adhesive creates a clean look without visible hardware. Screws provide extra stability, which is ideal for frequently used areas.
Make sure the lights sit flush and securely in the recesses. This step prevents shifting and ensures a polished appearance over time.
Concealing and Managing Wiring
The space under your stairs is a great place to hide wires and maintain a clean look. Use cable channels or clips along the edges to keep wiring organized and out of sight.
Connecting the Power Supply
Properly connecting the power supply keeps your lights working smoothly and prevents potential hazards.
Wiring to the Electrical System
For a lasting and reliable solution, connect the lights directly to your home’s electrical system. Hardwired connections provide consistent power without the hassle of changing batteries.
Hire a professional if you’re unsure about handling electrical work to ensure safety and compliance with local codes.
Installing a Switch or Motion Sensor
Add a switch, motion sensor, or dimmer to control the lights easily. Motion sensors are especially helpful for stair lighting since they turn the lights on and off automatically.
Dimmers let you adjust brightness, giving you more control over ambiance and energy use.
Securing and Insulating Connections
Secure all wire connections tightly and insulate them properly. Loose or exposed wires can cause malfunctions and create safety hazards.
Double-check that all connections are stable and that no wires are left exposed before completing the installation.
Testing and Final Adjustments

Before finishing the project, test the system to make sure everything works. Taking a few extra minutes now can prevent problems later.
Power On and Check Brightness
Turn on the lights and check the brightness. Walk up and down the stairs to see how the light falls on each step. Look closely at how evenly the light spreads.
Check for any dark spots where the light isn’t reaching. Also, watch for overly bright areas that might look harsh. Even lighting is key to creating a clean, polished look.
Make Necessary Adjustments
If the lights aren’t aligned correctly, reposition them for better results. Small adjustments can make a big difference.
Tweak the angle of the lights to get a more balanced glow. Adjust brightness levels using the dimmer switch to match the desired mood. Soft lighting creates a cozy feel, while brighter settings enhance safety.
Secure Loose Wires and Clean Up
Once the lights are in the right position, check for loose wires. Tuck them away securely to avoid damage or accidents.
Bundle any extra wiring neatly and secure it with clips or ties. A clean setup keeps the area safe and organized.
Finish by cleaning the workspace. Remove any dust, debris, or leftover materials. This final touch leaves the project looking professional and complete.
Cleaning and Maintaining
Dust can collect on LED strips over time, reducing their brightness. Gently wipe them down with a microfiber cloth to keep them clean. Avoid using harsh chemicals that could damage the lights.
Fixing Flickering or Uneven Lighting
Loose connections or worn-out components often cause flickering. Double-check the wiring and replace any faulty parts. A stable power supply helps prevent future issues.
Upgrading or Replacing Components
Upgrading your LED strips or dimmer switches can improve the overall lighting. Newer components often offer better energy efficiency and brightness. Choose reliable brands to ensure lasting results.
Conclusion
Recessed LED stair lighting not only enhances your home’s look but also makes your stairs safer. Improved visibility reduces the risk of accidents, especially in low-light areas.
By following these steps, you’ll create a clean, polished finish that adds style and value to your space. Proper planning and careful installation ensure long-lasting results.
Regular testing and maintenance keep the lights working perfectly over time. Checking for loose wires or dimming issues ensures that your system stays safe and efficient.
Ready to upgrade your stairs? Start planning your recessed LED stair lighting today. A little effort now can make your space look better and feel safer for years to come.
Got tile steps? Read this article.
FAQs on Installing Recessed Lighting for Stairs
How do you add lighting to a stairwell?
To add lighting, use recessed LED stair channels or strips. Create recesses in the risers or treads, secure the lights with adhesive or screws, and connect them to a power source.
What type of lighting is best for stairs?
Recessed LED channels or LED strips are ideal for stairways. They provide a clean, modern look and improve visibility without being too harsh.
How deep should the recesses be for LED stair lighting?
The recess depth should allow the LEDs to sit flush with the surface. Usually, a depth of about 10-12mm works well, depending on the channel size.
Can you install recessed stair lights yourself?
Yes, you can install them yourself if you’re comfortable with basic tools and wiring. For hardwired connections, hiring an electrician is safer.
How do you hide the wiring for stair lights?
Conceal the wires under the stairs or along the edges. Many homes have a storage area under the stairs, making it a convenient place to hide wiring and install the power supply.


