LED strip lights are a versatile lighting solution, adding functional and aesthetic value to spaces.
Whether you’re creating ambient lighting under cabinets, vibrant accents with RGB strips, or outdoor lighting installations, knowing how to cut LED strip lights correctly ensures the success and longevity of your project.
This guide will detail the tools, steps, best practices, and common mistakes when cutting LED strip lights, as well as address common questions about the process.
Tools Required for Cutting LED Strip Lights
To ensure precision and maintain functionality, you’ll need the following tools:
Sharp Scissors or Utility Knife

A clean cut is critical when working with LED strip lights. Sharp tools prevent crushing the strip and damaging its internal wiring. Avoid dull scissors or blunt blades, as they can create uneven cuts, potentially severing essential components.
Voltage Tester
Before starting, ensure the strip is disconnected from any power source. A voltage tester helps confirm that no electrical current is running, protecting both the strip and yourself from potential hazards.
Soldering Iron and Solder
These are necessary if you plan to reconnect or extend your LED strip without connectors. Soldering provides a durable and permanent connection for high-quality results.
Heat-shrink tubing or Silicone Sealant
Sealing the exposed ends of the strip is vital for installations in humid or outdoor environments. This step prevents moisture or dust from entering and damaging the strip.
LED Strip Connectors

A convenient, solder-free option for reconnecting or extending strips. These connectors align perfectly with the copper contacts, ensuring an effortless and secure connection.
The Process
Now that you have the tools and materials needed, let’s get into the actual process:
Step 1: Preparation
Start by measuring your installation area to determine the exact length of LED strip lights you need. This ensures that the cut is accurate and eliminates unnecessary wastage. Ensure you’ve also reviewed the manufacturer's instructions, as cutting procedures may vary slightly between products.
Step 2: Cutting Process
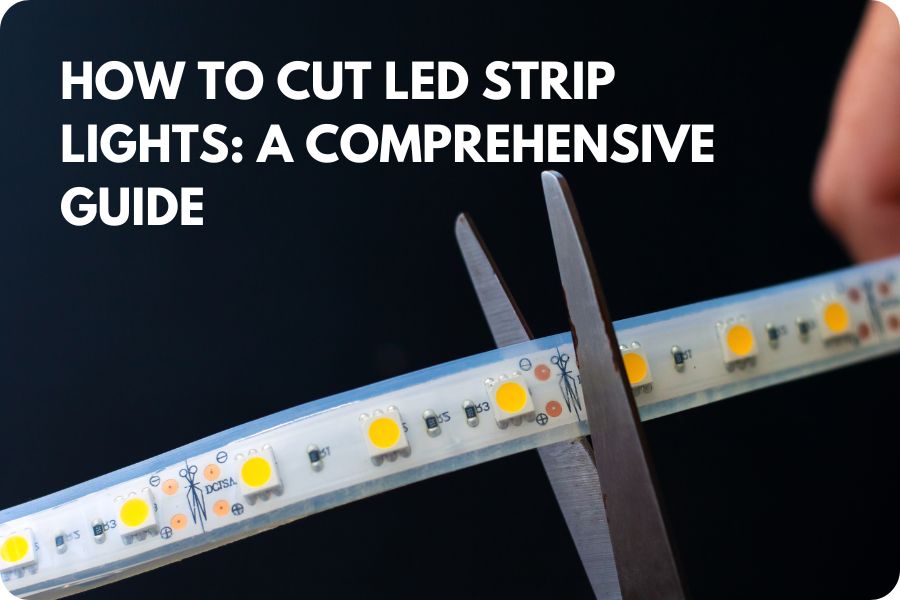
Turn off and disconnect the power sources. Working on a powered strip can cause electrical shocks or short-circuit the lights. Always disconnect the power source before proceeding. Locate the cutting line. LED strips are marked with cutting lines, often denoted by scissor icons or gaps between copper dots. These marks indicate where the circuit ends, allowing for safe cutting without disrupting the flow of electricity. Cutting outside these points can damage the strip and make it unusable.
Make a precise cut by aligning your sharp scissors or utility knife with the marked cutting line and making a clean, straight cut. Be careful not to bend the strip during this process, as it could damage internal components.
Seal the cut ends for projects in humid areas or outdoor settings. Seal the exposed copper contacts using heat-shrink tubing or silicone. This step protects the strip from moisture, dust, and debris, which can cause corrosion or electrical faults.
Reconnect cut LED strips if needed. Use strip connectors to align the copper dots on both ends. Alternatively, solder the ends for a stronger and more durable connection. Always ensure you match the polarity of the "+" and "-" terminals when reconnecting.

Step 3: Safety Precautions
Handle sharp tools with care to prevent injury.
Double-check all connections before powering on the strip.
Follow any additional instructions provided by the manufacturer.
Best Practices for Cutting LED Strip Lights
To do something is one thing, to do something well is another. Let’s get into the best practices you should implement in your next cutting project:
Measure twice and cut once.
Avoid costly mistakes by ensuring your measurements are accurate before cutting. A proper fit enhances the final look and prevents wasted material.
Use high-quality tools.
Investing in sharp scissors or utility knives ensures clean cuts and preserves the integrity of the strip. Using the wrong tools can damage the strip’s copper pads or circuit board.
Test before installation.
After cutting, test the LED strip by powering it on briefly to ensure all segments function correctly. This step saves you time and effort later.
Protect against environmental factors.
For outdoor or damp environments, sealing the cut ends is non-negotiable. Exposed contacts can corrode or cause short circuits over time.

Common Mistakes to Avoid
Here are some things you don’t want to do:
Cutting Outside Designated Lines
Cutting LED strips anywhere other than the marked points disrupts the circuit, rendering the strip inoperative. Always look for scissor icons or copper dots.
Neglecting to Disconnect Power
Working on live strips can cause electrical shocks or damage to the strip. Disconnect power before handling.
Using Improper Tools
Avoid dull or unsuitable tools that could crush the strip and sever internal components.
Skipping Sealing in Outdoor Installations
Leaving cut ends exposed in damp or outdoor environments invites moisture and dust, which can degrade performance and shorten the lifespan of the strip.
Conclusion
Cutting LED strip lights properly is essential for achieving a polished and functional lighting setup. With the right tools, precise execution, and adherence to best practices, you can customize your LED lights to fit any space seamlessly. Always prioritize safety and take the time to test your work before finalizing the installation.
Frequently Asked Questions
Here are some of the most commonly asked questions about this topic:
Where Do I Cut an LED Strip Light?
Always cut at the designated cutting lines. These are placed at regular intervals to ensure the electrical circuit remains intact after cutting.
Do LED Strip Lights Still Work When Cut?
Yes, as long as you cut along the designated lines and seal the ends properly. If you plan to reconnect the strips, use connectors or solder them for continuity.
How Do I Know If I Can Cut My LED Strip Lights?
Check the manufacturer’s guide or packaging for instructions. Most flexible LED strip lights are designed to be cut, but some non-flexible or integrated types may not be suitable for cutting.
What Happens If I Cut LED Strip Lights Incorrectly?
Cutting outside the marked points can sever the electrical circuit, leaving parts of the strip inoperable. Additionally, improper cuts or unsealed ends can lead to malfunctions or damage over time.


